Showing posts with label baking. Show all posts

Thursday, August 18, 2011

Strawberry Pies


Luscious Strawberries, Sweet Glaze and Flaky Crust


So I bought a flat (12 pints) of fresh, locally grown, organic, ripe strawberries. Washed them and hulled them:

Fresh. Ripe. Juicy.


Made a couple of flaky pie crusts:

Ugly but flaky!


Cooked up some strawberry glaze and made two very tasty fresh strawberry pies!


Fresh Strawberry Pie


I also had some berries left over to use in my yogurt and smoothies. Next batch of strawberries will be used to make some homemade jam. Yum!


© Copyright 2011 Mountain Harvest Basket

Saturday, July 2, 2011

Montmorency Cherries for the 4th


Cherry Filled Bowl


Also known as "sour" cherries. These Montmorency cherries are best for cooking and baking rather than for eating fresh out of hand.

So far this season I have harvested about 1 quart of these sour cherries, which is about 4 times more than I harvested last year! And there are more still ripening on the tree. Yay!


And yes, of course, I will make my World Famous Cherry Pie with them and probably use the remainder of the Sweet Cherries to round out the taste too.


Summer is definitely here! Hot and sunny (and humid) here today.

Have a safe and happy 4th of July weekend, everyone!


© Copyright 2011 Mountain Harvest Basket

Sunday, December 19, 2010

Future Banana Bread


Future Banana Bread or Artistic Still Life Display??


My house will smell lovely with the scent of freshly baked banana bread. My taste buds will thrill at the sweetness and delicate crunch of that first warm bite.

That is if I can make the time to actually get into my kitchen and bake it.

Soon, say I. I will do it "soon".


© Copyright 2010 Mountain Harvest Basket

Monday, November 1, 2010

Best. Cherry. Pie. Ever!


Leaky, but luscious, Cherry Pie

First off, this is a VERY belated blog post. I made this cherry pie way back in mid July at the peak of the summer fruit season. Hot days and balmy nights. The whole summer thing. I've just been so busy since then, that today, over 3 months later, is the first chance I got to compose this post.

I've made cherry pies before, but only from canned tart cherries. This is the first time I have ever made a cherry pie from fresh cherries. This time I had enough fresh fruit available and a very handy cherry pitter to make the best cherry pie I have ever tasted. Ever.

This is the first year that I could use fresh sour cherries from my young Montmorency Cherry tree. (I call her Mary Montmorency.) She gave me just over one cup of fresh tart cherries.


(Mary) Montmorency Tart Cherry Harvest 2010

Well, one cup of cherries is not enough to make a whole pie, so I also used a combination of Bing Cherries and Van Cherries from my sweet dual graft cherry tree. Usually I just eat these nice sweet cherries out of hand for snacking, but this year my dual graft tree produced enough for snacking and some baking projects. I had a bit over 3 cups of fresh cherries, tart and sweet ones combined, for my pie.


Combination of Montmorency, Bing & Van Cherries for pie

For some reason my pie crust turned out especially flaky (not sure what I did right to make it that way), and the combination of cherries made this pie taste wonderful. I can only hope to bake another one just as good as this one with next summer's cherry harvest. If not, well, I have my cherry pie memories to savor.


Tart/Sweet Fruit Filling, Flaky Crust


Looks good enough to eat!


Till next summer's cherry harvest these photo memories will have to do!


© Copyright 2010 Mountain Harvest Basket

Thursday, June 25, 2009

Jam & Bread


Homemade Raisin Bread (left) & Wheat Bread (right) Sandwich Loaves

I finally created a couple of wheat sandwich loaves that were tall enough to produce decent sized sandwich slices. I made one a plain wheat bread and one I turned into cinnamon raisin bread. This was my first time making the raisin bread and I didn't quite get the raisins and cinnamon to produce the nice spiral swirl effect I was aiming for. See the photo below.


Cinnamon Raisin Bread Sliced ~ raisins slightly misaligned

It still tasted good though, even if the raisins were sort of all clumped together in places. Next time I will make a few adjustments to my swirl technique.


Remember that Homemade Strawberry Jam?

I had to make some sandwich bread so that I could eat some of my homemade strawberry jam that gave me so much trouble last weekend. I've been looking at the jars sitting on my kitchen counter all week admiring the deep rich red color. Tonight was the first time I tried some of this particular batch.

It was very good!


Almond Butter & Strawberry Jam on Raisin Bread = Dinner


© Copyright 2009 Mountain Harvest Basket

Wednesday, June 17, 2009

Shiny Red Pie


Flat of Beautiful Organic Strawberries

I have a whole flat of beautifully ripe, locally grown, organic strawberries.

What to do...what to do...?

Eat several right away before even arriving home with my red bounty?...yes.. that's good.

Mix a few into my morning yogurt along with some of my luscious homegrown boysenberries?....

Mmmm...yes, good again.

Make strawberry jam? Well, yes, but not right now. Must figure out what to do with these fresh berries. They don't keep fresh long you know.

I know!! I will make a fresh strawberry pie! I've never done that before. I've eaten lots of fresh strawberry pie, in restaurants mostly, but never have I made my own at home.

Now where was that recipe I found after much searching and exploring? Oh yeah, right here in my Betty Crocker Big Red cookbook. Silly me. Looking all over the internet for a simple pie recipe and here was one right here at home. Some slight modifications, and the recipe is now mine. Ha!

So made pie I did:


Fresh Shiny Red Strawberry Pie


All those fresh, ripe & tangy strawberries mixed in there with a just a little sugar for sweetness and a little cornstarch to make a nice thick syrup that holds everything together.


Shiny Red Pie ~ closeup


Just strawberries, sugar, cornstarch, water and a flaky homemade pie crust.

Fruit as nature (and Betty Crocker) intended it.


Ooh... a piece is missing...


My Dessert ~ MMmmmmm....

Well, it's almost completely natural and unadorned. Gotta have a little whipped cream for decoration, you know.


© Copyright 2009 Mountain Harvest Basket

Thursday, June 11, 2009

White Bread Rising


White Bread Dough Rising


Homemade White Sandwich Loaf


Same Loaf, Different Angle


Sliced Bread


BLT in the Making (note my homegrown lettuce)


Dinner!


© Copyright 2009 Mountain Harvest Basket

Monday, February 16, 2009

Woman Does Not Live By Bread Alone


Wheat Bread Loaf #2

...but baking my own bread is very satisfying.

I have made two sandwich loaves of wheat bread in my recent baking flurry. Both of them were made with a combination of White Whole Wheat and All Purpose flours. They came out reasonably well, with good taste and texture and color, but not quite as tall and fluffy as I would like. The white whole wheat flour produces a nice & soft, lighter tan colored loaf. I think I need to either use more yeast or let it rise longer to get the lift I desire in my bread. Or maybe do both.

Baking and cooking is good creative expression for me. It allows me the freedom to design what I want and to make it my own way. Gives me freedom and also some control. I say some control, because my creations don't always turn out exactly the way I want them to. Actually, that's sort of the fun part. A little adventure and surprise in the kitchen. Safe adventure. Just my speed.

I started this recent bread baking because I became aware that I was spending almost $5 per 1 1/2 lb loaf of store bought bread. So I decided that making my own bread would save me some money. It does that. Now I am not sure I can go back to eating store bought bread again. I really like the way my homemade bread tastes. It is so much fresher tasting that store bought. Even when my wheat loaves don't rise as tall as I would like.

It makes great sandwiches and toast.


Slices of homemade Wheat Bread

Hopefully, I will find the time to bake some more soon. I do enjoy it.

© Copyright 2009 Mountain Harvest Basket

Thursday, January 29, 2009

OMG PB&J Sandwich-gasm!


Peanut Butter & Apricot Jam on freshly made white bread

It was so good that I almost forgot to take a photo for you all. That was probably the best PB&J sandwich I have ever tasted.

I like this bread baking stuff. Gonna keep doing it.

© Copyright 2009 Mountain Harvest Basket

Wednesday, January 28, 2009

White Bread Again


Farmhouse White Bread #2

Well, I decided to try baking another loaf of Farmhouse White bread that I wrote about in my previous post.

This time I used the same basic recipe as last time with just a few tweaks. I added 1/4 teaspoon more instant yeast and I cut way back on the salt, using only about 1/4 teaspoon this time, since I found the first loaf a little salty for my taste buds. I also didn't have any bread flour available, so I used all purpose flour with some extra wheat gluten added in (1 teaspoon gluten per cup of flour to make bread flour substitute). Again, I used my favorite brand of flour, King Arthur.

Just for experiment purposes and also because I was too busy today to tend to mixing and kneading bread dough all by hand, I put the ingredients into my bread machine and let the machine do the work for me. After first rise the dough was ready for me to remove and shape into a loaf. Unfortunately, or maybe fortunately, I was distracted by other things and let the risen dough sit in the machine for about 30 minutes longer than I was supposed to.

Well, I took it out and flattened it out a bit into a large rectangle, then rolled it up like a jelly roll into a log shape and plunked into the same loaf pan that used for the first loaf I baked a few days ago. Making sure to crimp the edges together so it would stay together as a nice loaf shape. I covered it with a damp tea towel and set it on a TV tray in front of the fire in my woodstove to maintain a temperature of about 74 degrees F while the dough rose in the pan.

Well, either the warmer room, the little more yeast, the smaller amount of salt or the gluten enhanced flour made this loaf rise a lot more than the first one did. After about 60 minutes it had doubled in size and was pushing the tea towel up and up. So into the oven it went to bake for 35 minutes at 375 degrees F.

It came out fluffy and beautiful. Much more the shape that I desire in a homemade sandwich loaf of bread.


Better shaped sandwich bread

It tasted a better to me than my first try because it isn't as salty, and I like that better. I have already eaten 3 warm pieces of bread with butter, and I usually don't use butter even when I bake. I only use it on fresh warm bread, so this bread baking hobby of mine may not be so good for my saturated fat intake. Perhaps I should try my fresh bread dipped in extra virgin olive oil and balsamic vinegar. Yes, that might be good.

I will have to see how this second loaf performs as toast and in sandwiches. Will it fall apart or will it be elastic enough to hold substantial sandwich contents? How long will it stay fresh? So much experimenting to do!

I do plan to make bread completely from scratch, doing the mixing and kneading completely by hand again, but I had to try it out at least once using the bread machine. Now I know what results I will get on those days when I don't have time to do it all by hand. I may also have learned something about the kneading process from the bread machine. I may have kneaded the dough a little too roughly by hand, perhaps making more gluten than I needed to, in my endeavor to be thorough my first time out. I am after all, a massage therapist by profession, one whose specialty is deep tissue work which involves a lot of heavy kneading of my client's muscles. I may have taken the kneading job a bit too seriously when making bread the first time. So the next time I make fresh bread completely by hand, I will lighten up a bit, perhaps giving my bread dough a lighter "spa massage" instead of the full up "sports massage". Ha!

Happy baking everyone. Good thing to do on a cold winter's day.


© Copyright 2009 Mountain Harvest Basket

Monday, January 26, 2009

Bread 101


Freshly Baked Loaf of White Bread

Well, since we have had Muffin Monday and Soup Saturday here at Mountain Harvest Basket recently, I thought it was time for "Bread Baking Sunday". Well, so much for continuing with the fun alliteration...oh well, maybe "Sandwich Loaf Sunday"...

I have baked bread before "from scratch", but always with the aid of a bread machine to do the mixing and kneading etc. I would usually take the dough out of the machine before the baking cycle, and shape and bake it in my oven since I don't like the way my bread machine baked bread turns out. Funny shapes and hard crusts come out of that bread machine, but it does make mixing the dough an easy task. However, easy does not always give a good homemade product. So this time I decided to try my hand at mixing, kneading etc all by hand. I really want to be able to make great tasting, healthy and less expensive fresh breads for myself and my family.

So I started with this recipe I got from Farmgirl Susan from her great blogs Farmgirl Fare and A Year in Bread. She calls this bread Farmhouse White. I have tried several of her other recipes over the past year and have always been pleased with the results.


Since Farmgirl Susan's recipe for Farmhouse White bread makes 3 loaves of sandwich style bread, I decided that for this first bread making experiment I would only make one loaf just in case I really screwed up and it didn't turn out. I didn't want to waste 3 times the ingredients my first time up at bat.

I followed her instructions carefully and I was very pleased with the results of my first time making and baking a loaf of bread completely from scratch. Of course, her loaves of bread look so much better than mine do. Mine wasn't as tall and fluffy looking as hers were. She gives some hints on which loaf pans to use to get that tallness, and my pan was not exactly the right size. This does give me a good data point from which to progress with future baking projects.

I was very pleased with the taste and texture of this bread. It was moist yet not soggy. It was elastic enough to make a good sandwich without falling apart as my previous breads had. It tasted great, perhaps a bit salty for me (since I don't use salt in much of anything), and the crust turned out a beautiful light golden brown.


I will make this bread again. I will find better loaf pans. I will experiment with different kneading techniques and play with the ingredients.

Someday I want to make whole grain breads and crusty artisan loaves as well as this basic white sandwich style bread. I had a fun time baking on a cold and rainy Sunday. I just might enjoy this as a new hobby. I'll see how it goes.

Any suggestions from you all on which bread baking book I should buy that will tell me the basic methods and also have other recipes for me to try?

© Copyright 2009 Mountain Harvest Basket

Monday, January 19, 2009

More Muffins


Freshly baked banana nut muffins!

Well, true to my word, I baked another batch of my banana nut muffins the other night. You know, just to keep the house warm with the heat from the oven.

This batch of muffins was even more delicous than the last. I've been using more King Arthur brand flour in my baking lately, and I've been loving the great results. The texture of these muffins are really nice. Moist with great crumb, but not soggy. I used half King Arthur all purpose flour (white) and half King Arthur "white whole wheat" flour in these. I am very pleased with that combination. I try to add as much whole grain healthiness into my cooking and baking as I can.


Ready for the oven

I was also pleased to note on the King Arthur flour bag that their flour is milled from all US grown wheat. I like that. They just seem like a really good solid company. I will be using more of their flour in my baking and cooking from now on.

I was watching a Good Eats episode on TV the other night that had Alton Brown telling us all about making muffins. I recall he said we would get more volume out of our muffins if we cooled them upside down on a tea towel. So I tried it.


Muffins cooling

Not sure if I got more volume in my muffins, but it did work well for allowing them to cool nicely. I had them upside down for awhile on a clean tea towel placed over my cooling rack. The tea towel prevents the cooling rack from leaving marks on the muffin tops. It worked.

You will notice that I used paper baking cups to line my grandma's old muffin pan that I use. Keeps them from sticking, reduces clean up and gives them a nice wrapper when sharing with friends. I usually use the standard pastel paper cups that I find for sale in my grocery store. You know the ones, they come in pastel pink, yellow and blue. Well, about a week ago, I was in the baking supply aisle of our Whole Foods market, looking for something else, when I spied some new, more environmentally friendly baking cups.

Natural muffin cups

They are natural brown, made from unbleached paper and compostable. The cardboard box they are packaged in is made from 100% recycled paper. They cost a little more than the regular cups, but not much more.

What I liked best about their performance is that the muffin paper peels off so easily from the muffin, no sticking at all. And they look really nice on the muffins. A toasty brown color instead of the pastel colors. I think it enhances the rustic muffin look. Also I don't have to worry about who gets the pink one or the yellow one etc, because they are all brown... Ha! Yes, I need a life...

Anyway, more environmentally friendly muffin cup info can be found at the If You Care website. Apparently, they make coffee filters and other paper products too. Not a great website, but it does give more info.

Happy winter baking to you all!

© Copyright 2009 Mountain Harvest Basket

Friday, January 16, 2009

Spring in January?


Spring bulbs emerging early

I know that many parts of the US are having very cold weather right now. Lots of snow, ice and rain going on out there according to the weather news. Here in the Sierra foothills we have been having unseasonably mild weather all week. It's been very sunny and warm during the day with mild breezes. Feels like Spring is happening in the middle of January.

A couple of days ago, I donned a short sleeved tee shirt and a pair of summer shorts and sat in my lounge chair (you know, the lounge chair that was covered in 6 inches of snow not very long ago) to soak up some sun and get my natural vitamin D while reading my newest herb book. I must have stayed out there about an hour just enjoying the quiet day and relaxing. Something I don't do very often. I even heard a few frogs/toads waking up and talking to each other. Sure seemed like Spring was starting in the middle of January.

The photo above shows Spring bulbs, they are either crocus or grape hyacinth, that are planted in my terra cotta bowl on my porch, emerging from the soil as the weather warms up this week. They are even bigger today than when I took this photo earlier in the week.

I know we will get more cold, rainy and even snowy weather before Spring really arrives in March, but for now we are having a nice Spring preview. It is confusing the plants though. They will all pop out and then get snowed on in a few days or weeks. Always an adventure with nature.

For those of you who have colder weather where you are right now, take heart that Spring is not very far away. It will be here soon.

The nights are still cold here. Each day in the late afternoon the temperature drops and my house does get quite cool. I haven't been building many fires in my woodstove yet this winter, but I have been baking things in my kitchen. You know, just to help warm up the house...

Last week I baked a batch of banana muffins to use up the overripe bananas, and to warm up the house, of course.


I need to make another batch, as these are long gone by now, and I have more overripe bananas sitting around. And I need to keep my house warm on these cold nights....yeah...that's it...keep the house warm.

What's the weather like where you are today?

© Copyright 2009 Mountain Harvest Basket

Sunday, December 7, 2008

Winter Green & Cornbread


Green Pumpkin & Parsley

It has been warm for several days and then cold at night, and now it is finally getting colder during the day and very cold at night. My porch thermometer reads 44 degrees F as I type this.

I plucked this last sweet little pie pumpkin from my garden about a week ago. I kept waiting for it to turn orange first, but I couldn't let it sit out there in the cold weather any longer. I brought it inside in the hopes that it would ripen indoors. It is doing just that, although very slowly. There are some flecks of orange on it and I placed him with his orange colored sisters hoping their ripeness would "rub off" a little on his green little self. There below is my whole pumpkin family for this season.


Small, sweet & tender pie pumpkins


So with the weather getting much colder now, I figured I'd better harvest the last little green bell pepper from my garden. I had left the plant in the ground due to the extended warm weather and because it had a pepper growing on it. It was fairly protected in my raised bed garden, blocked from cold north winds by the back wall of my house. The nights have been getting far too cold for a hot summer crop like bell peppers! Reports of temps in the 30's made me concerned that this little green pepper gem would shrivel up and be culinarily useless, so today I plucked it right off the plant and brought it inside with a brief stop on my porch for a photo op with her neighboring parsley plant.


Green Bell Pepper & Parsley Harvest

My parsley plants are still growing strong, and I bet if I protect them with a cold frame for the winter, they will last right through until spring and keep on producing for me. I use parsley in so many things, not just as a pretty garnish. I like to put a healthy handful in my green salads and I love to cook with it. It is very nutritious.

To change the subject slightly from green garden things to warm food for cold days, take a look at the nice cornbread I baked in my cast iron skillet a couple of weeks ago. I had never used this skillet for baking before, and I am very pleased with the results. The cornbread was delicious!


Delicious hot homemade cornbread

I just had to show it to you. Now I made myself hungry. I guess I should go make myself dinner now. No cornbread in the house though. Guess I'll make a sandwich...


© Copyright 2008 Mountain Harvest Basket

Sunday, August 3, 2008

Happy Half Birthday Jack!


Half Birthday Cake ~ on fire!

Life is short.

Seems like the days pass by more quickly with each passing year. Loved ones come into your life, stay for awhile, maybe grow with you, and sometimes they leave. Sometimes unexpectedly. Sometimes it is through the losses we experience in our lives that we become aware that life is precious, our loved ones are precious and that we need to celebrate and enjoy our love and our lives every chance we get.

It is with this semi-deep introduction that I share with you our family tradition of celebrating not only our annual birthdays, but also our half birthdays. It is a tradition that I started about 15 years ago. I got the idea from a Hallmark greeting card advertisement. They were just trying to sell me more birthday cards and wrapping paper, but I saw an opportunity to have additional celebrations throughout the year. I like cake and gifts and happy parties. I like seeing my loved ones happy.

So I created my own version of half birthday celebrations. I will tell you about it.

First of all, a person's half birthday occurs 6 months after their last annual birthday (on the same date of the month, but 6 months later). In this case, we celebrated Jack's 1/2 birthday which occurs on July 30th. So this party happened last Wednesday evening.

After you have the date set, you need to gather the appropriate ingredients for your half birthday party. The most important of these you can see in the photo above, a homemade half birthday cake. Now this is not just a two layer birthday cake cut in half. It is a single round layer of cake, cut in half and then frosted as if it were a whole round cake. There is frosting in between the layers and slathered all around and on top. You can either make half the recipe for the whole round cake or make the whole recipe and save the other layer to eat as a snack cake at some later time.

Jack's half birthday cake shown above was made by me, and it is a zucchini spice cake with pecans. The zucchini of course was homegrown in my veggie garden. It is frosted with a lemon cream cheese frosting. Very tasty, smooth and decadent.

Then just like regular birthdays, half birthday gifts are another important ingredient. The difference in gifting for half birthdays, is that the gifts usually are less in number and less expensive more "fun" gifts. Not "gag" gifts, mind you. Just more along the line of trinkets or accessories. I said usually this is the way it goes. Well look at the pile of presents Jack received in the photo below:


Jack's Half Birthday Gifts

I think we did go a little overboard on the number of gifts for this half birthday. There were about twice as many gifts as usual. Between my gifts and Bob's, Jack did very well in the gift department. None were all that expensive, and some were quite fun, but I will get to that after I show you the "cake ceremony" as we refer to it around here.

We are on my front porch, half birthday cake aflame, and this is Jack waiting patiently for me to fetch my camera and take the picture before he can make his wish and blow out the candles. Note the colorful natural beeswax candles adorning the cake.


OK, I took the photos of the flaming cake, Bob and I sang "Happy Half Birthday" to Jack and then Jack was free to wish and blow. And blow he did!


One big breath of air blew all of the candles out. That means he gets his wish!

So now Jack gets to open his half birthday cards and gifts. His gifts were varied and all were useful things, from the barbecue cover and rain gauge from Bob, to the coffee gift card and watch repair tools from me. One gift from me caused great amounts of curiosity and hefting, feeling and shaking of the wrapped package to figure out what was inside, immediately followed by large amounts of laughter once the gift was opened and revealed.


What could it be that caused such fits of laughter?
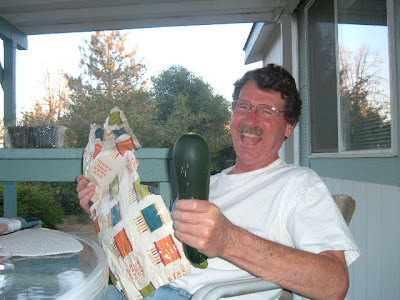


Why, a homegrown zucchini, of course!

A big 1 1/2 lb homegrown dark green zucchini, freshly plucked from my garden that very afternoon. He loved it! I told him that I had to share some of the prolific zucchini and this was a good opportunity to do it. I am sure he double checked to see if he had locked his car doors or not. I gave Bob a zucchini "party favor" to take home and enjoy too.

After the cake ceremony and opening of the gifts, we had a nice dinner outside on my porch table. The menu consisted of Zucchini Parmesan seen below:


Zuke Parmesan ready to bake


Zuke Parmesan just out of the oven

Gotta use up that fresh zucchini!

We also had my famous Stuffed Broccoli Leaves which is sort of a cross between Greek dolmas and my Mom's Stuffed Cabbage Leaves. The broccoli leaves were from my garden. This is my favorite way to use the fresh broccoli leaves, although I do cook them as "greens" other times. Their taste, color and texture remind me of the grape leaves used in the Greek dolmas (stuffed grape leaves). They were delicious!


Stuffed Broccoli Leaves in the pot ready to cook


Cooked and about to be eaten! (A taste test by the cook)


After we had our fill of comforting dinner fare, we indulged our sweet tooth with zucchini spice half birthday cake topped with the natural vanilla ice cream that Bob contributed. The combination of the cool creamy vanilla with the sweet spicy texture of the cake was outstanding!


Zuke Cake and Ice Cream. Yum.

We finished the evening by watching an entertaining movie on DVD. A fun family evening at home. No crowds. No travel, traffic or parking. No waiting for service. Very comforting.

Half birthdays are a fun way to celebrate our lives together. A tradition that we will continue.


Bob enjoyed the party too.


© Copyright 2008 Mountain Harvest Basket